Coolio’s Guide to Remote Playback
Now that playback on your device is available for iPeng, a lot of people have been asking how you can configure this to work not only at home but also remotely.
So here’s a little writeup of how that works.
Please note: unless you use this over a VPN (Virtual Private Network, see last point below) this is inherently not secure. Although no real vulnerabilities are known yet, they might very well be there. For this reason I would strongly recommend to only run this if your server that contains your music data and Squeezebox Server software doesn’t contain any sensitive data and you are having good backups of it.
If you chose to use a VPN (especially recommended if your router already supports it) you can spare yourself the part about port forwarding below.
The Big Setup
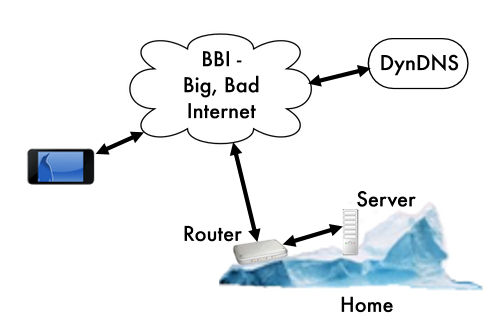
This is how the world looks like for a little penguin trying to use iPeng from abroad:

I’ll show you how you have to configure your Router, your Server and iPeng to make this work.
The Server
The server is the part of the picture that is the most simple one to handle. You have to install Squeezebox Server (you did that anyway to feed your Squeezebox with your music) and you have to know it’s setup.
There are two things you need to do on the server
1. Find out your server’s IP Address (Server IP) and the HTTP Port number (Server Port).
You can do so in the Squeezebox Server’s Web interface under
Settings->Information->Squeezebox Server Status
Or in iPeng under
Settings->Advanced->Squeezebox Information->Squeezebox Server
2. Set a username and password. Otherwise, your Squeezebox Server will be exposed to the internet without any form of protection and anybody could log in and e.g. play some music in your home. Or SET a password.
Important: The usename/password combination used by Squeezebox Server will be sent entirely without any protection. So please use a unique username/password combination and not your facebook account.
You can set this in the server’s web interface under
Setting->Advanced->Security
Fixed IP Address
There is one more thing about your server: To make all of this work, the server’s IP address needs to stay the same.
On a typical home network setup IP addresses are being assigned automatically by the router (or by a DHCP server, to be precise. That’s usually part of the router, if not, you probably know yourself how to set up a network) and can change with every power up.
There are two ways to change this: one dangerous and one good one.
- The dangerous way: Set the IP address in the computer. Windows, for example, supports this in the system settings. The “dangerous” part about this is that you have to chose an address that your router doesn’t use for the dynamic assignment or you will have two devices with the same address. And it needs to be in the IP range (“subnet”) your router also uses. Routers usually have address ranges they don’t use for this.
- The “safe” way: Tell the Router to assign a fixed address to your server. See below.
That’s it about the server.
The Router
Now for the tricky part.
A router is a device that essentially separates your local network (the icberg; with your server and all the Squeezeboxes) from the big, bad internet (BBI). Seen from the internet, your whole network only has a single address, your home’s IP address (Home IP). To make things worse, in a typical DSL setup this also changes every day (actually a good thing from a security standpoint).
This IP address has nothing to do with the IP addresses in your network. The latter ones are usually something like 192.168.x.y or 10.x.y.z, the former can be anything else and depends on country and internet provider.
So what you want to do now when you want to stream your music to your iThingy is to reach ONE of the devices on your local network (the server) by calling your home’s IP address. Now you have to tell that to your router.
What your router normally does is, it simply does not allow _anybody_to reach anything on your local network. Only your local network can call the outside world and the router will send any responses back to the computer which initiated that call.
So we have to change that behavior.
To do this, all routers I know have a web interface through which you can configure them. If your computer has an IP address of e.g. 192.168.0.x I would expect the router to be reachable under 192.168.0.1 and so on.
Port Forwarding
This is the big change you have to make.Your router’s web interface will have a section called “port forwarding”. In this section you can define rules for what to contact whenever somebody calls from the outside. You need to define two rules:
- Your Server Port, typically 9000: You need to forward your server port (see above) on the router to the SAME port on your server. The protocol is TCP. So what you enter is that you want to forward e.g. port 9000 on your router to port 9000 on your server’s IP address. It’s important that the two are the same. This is a Squeezebox thing and doesn’t apply to general networking, but here it’s important.
- Port 3483 TCP. This also should stay the same. Forward Port 3483 on your router to port 3483 on your server for the TCP protocol.
- There is a third one that is not needed for iPeng but I believe some Squeezebox models need it if you want to use them remotely: Port 3483 UDP. You also need to forward port 3483 (the same as above) for the UDP protocol. These are different rules!
Fixed IP Address
If you chose above to use a fixed IP address assigned through your router, you have to look for a component called DHCP in the router setup. Another wording may be “IP Settings” or “IP addresses” or simply “Devices“. What you will typically see is a list of connected (and unconnected) devices with an “edit” button. Here you typically can chose to fix an IP address for this device.
Find your server and assign a fixed IP address.
DynDNS
Now you are essentially done except for … that changing IP address. You could now reach your server from the internet but you would have to know the IP address. Which is awkward. And probably changes every day.
What you can do here, is set up a service called “Dynamic DNS”. Google it, there are several free ones.
What DynDNS does is, it sets up an internet address for you (something like “my_new.cool.address.com”) and connect that to your Home IP whenever that changes. Most of today’s routers support this by automatically sending your new address to the server once it changes.
So here’s what you need to do:
- Go to your Router settings again and find the “Dynamic DNS” section. Here, look up which services your router supports.
- Register with one of these services and set up an account and address
- Enter your account details in the router settings
Now you’ve got yourself a nice, new address through which you can reach your server.
Setting Up iPeng
Now for the last but easiest part (of course) 🙂
Go to iPeng’s settings under
Settings->iPeng Settings->Add Server

Enter your sever’s new address as in
my_server.dyndns.org:9000
If you use port 9000 you can omit the “:9000”.
That’s it, you just got yourself a remote streamer.
Have fun with iPeng Playback!
VPN
As promised: one more note on security.
All of what you have set up now will potentially be highly insecure so make sure you have no critical data on the machine you expose to the internet and that you have good backups.
A much better solution than directly forwarding the ports is to use a VPN, typically through a system called “IPSec” and which is supported by iPhone/iPad/iPod touch.
Some routers support this out of the box, in other cases you need to set it up on your server. The setup is highly operating system dependent so I can’t really give advice here but it’s definitely worth it.
