 See also in iPeng:
Help->Quick Tutorials->NowPlaying
NowPlaying is the screen where you enter iPeng. And it’s your control center for all Player and Current Playlist related functionality.
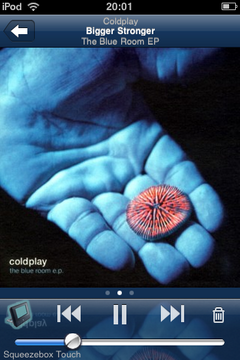
When you enter, you get a screen that should look familiar since it’s modeled after the iPhone’s iPod application. It also basically works like the iPod application but with some exceptions.
![]() Let’s start with the small ones: To the left of the usual Skip/Play/Pause buttons you see a Player icon matching your active Player‘s type. This player icon doubles as a Power button to turn your Squeezebox On or Off. A glow indicates the box is On.
Let’s start with the small ones: To the left of the usual Skip/Play/Pause buttons you see a Player icon matching your active Player‘s type. This player icon doubles as a Power button to turn your Squeezebox On or Off. A glow indicates the box is On.
![]() At the bottom left you see the name of the currently active player or group of synchronized players.
At the bottom left you see the name of the currently active player or group of synchronized players.
![]() Mute: You can Mute the volume by double tapping the volume slider. Muting will NOT set your volume to 0 but remember the volume level. On most Squeezebox models Mute will also not completely silence the Player.
Mute: You can Mute the volume by double tapping the volume slider. Muting will NOT set your volume to 0 but remember the volume level. On most Squeezebox models Mute will also not completely silence the Player.
![]() At the right side of the Skip/Play/Pause controls there’s a Trash icon. This can be used to clear the Current Playlist. It will bring up a modal confirmation and if you confirm clear the whole playlist.
At the right side of the Skip/Play/Pause controls there’s a Trash icon. This can be used to clear the Current Playlist. It will bring up a modal confirmation and if you confirm clear the whole playlist.
Hint: The volume control will also react to changes made using the volume keys on the side of the iPhone/iPod touch (not for iPod touch, 1st generation).
Group Control
iPod always only controls itself. However, if you use more than one Squeezebox, you can synchronize them into Sync Groups (see MultiPlayer Control below on how to do this with iPeng).
Now, if your Current Player (the active one) is part of such a Sync Group, your main Volume and Power controls will act on the whole Group instead of on a single Player. You can still control each Player individually on the MultiPlayer Control (see below).
Note: This is NOT the same thing as enabling power and volume synchronization in the Squeezebox Server’s Player Settings! Squeezebox Server‘s setting fixes volume and power to identical values on all players, in iPeng you can still individually adjust all players.
Also Note: If you want to not use this feature, you can turn it off using the Don’t Group Controls setting. However, we recommend that you give it a try first.

You can tell that Group Control is enabled from the Player Group icon on the left and the
Group (Player 1, Player 2,...)
indication in place of the player name.
Group Control works as follows:
![]() Power: The Power button does the following:
Power: The Power button does the following:
- If all Players in the Group are OFF, hitting the Group Power button will turn all Players in the Group ON.
- If one or several Players in the Group are ON, hitting the Group Power button will turn all Players in the Group OFF (“Leave Home Feature”).
![]() Volume: The Group Volume slider will show the average volume of all Players in the Group. Moving the slider will relatively adjust the Volume of all Players in the Group. iPeng uses a special algorithm to make the volume change as audibly similar as possible even if the volume level on different Players is grossly different. Volume Muting will also act on all Players in the Group similar to the logic for Power.
Volume: The Group Volume slider will show the average volume of all Players in the Group. Moving the slider will relatively adjust the Volume of all Players in the Group. iPeng uses a special algorithm to make the volume change as audibly similar as possible even if the volume level on different Players is grossly different. Volume Muting will also act on all Players in the Group similar to the logic for Power.
Pages
The biggest difference between iPeng’s and iPod’s NowPlaying screen is paging.
 iPod has a “Flip” button on the top right in the Navigation Bar, while iPeng has a set of paging dots below the cover. These dots indicate how you get to more choices on iPeng’s NowPlaying screen: it has several sub-pages between which you can swipe. Just like in Springboard (the iPhone’s main menu). And they swipe in and out on top of the cover. This way you can always see what’s playing, you’ve always got access to your current player but you can access all Player and Current Playlist related features.
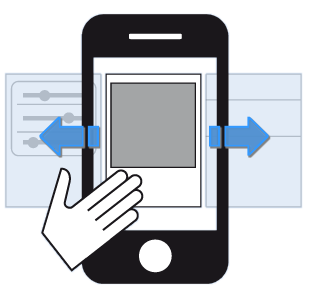
NowPlaying has three subpages. The one you see when you start iPeng is NowPlaying Main.
NowPlaying Main
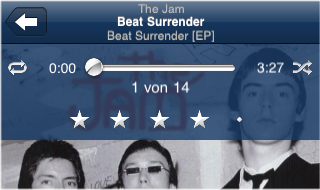
When you start, Main shows nothing but the cover art but you can tap it to toggle an overlay that will show elapsed time and some additional controls:
Progress Bar
The main element on the overlay is the progress bar. It does have a handle to drag it to the desired position within a song and can be used to select the position within a track. To the left, it shows the elapsed time, to the right the total time of the song. Below it is the position of the song within the current playlist.

Repeat
Off
Playl.
Song
Love
Appr.
Rew.
To the left of the progress bar is the Repeat control. For Library playback, this can take three states: Off, Repeat Playlist and Repeat Song. Like it’s usual with Squeezebox Server, this control will have different functionality when used with some plugins. For example, Last.fm and Pandora will show rating icons (Love and Approve) and Alien BBC will show Rewind.
Shuffle
Off
Playl.
Disc
Ban
Disapp.
Fwd.
Shuffle is to the right of the progress bar and acts similar to Repeat. It has the three Shuffle modes Off, Shuffle Playlist and Shuffle Album. Plugin features mapped to Shuffle include Ban, Disapprove and Fast Forward.
TrackStat Rating
On the lower part of the overlay there’s a control to see and set rating stars. You will need the TrackStat plugin to use this functionality, if you don’t have it installed, or if it doesn’t apply (e.g. for remote streams), it will not show up.

NowPlaying Context Menu
Like a lot of items in iPeng, NowPlaying Main has a Context Menu (see General Usability to learn more about Context Menus). Here, what that menu shows is context information (usually Song Info) on the currently playing track or stream. Through this menu you can access e.g. other tracks of the Artist for the current song, get embedded lyrics, and access to some Apps and Plugins.
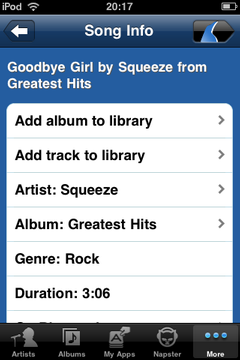
Please note that this menu actually makes you leave the NowPlaying screen and takes you to the Main Menu screen. This might look a bit confusing but is due to the fact that from the NowPlaying Context Menu you can actually browse your library starting with the currently playing track.
MultiPlayer Control
 See also in iPeng:
Help->Quick Tutorials->Players and Music Sources
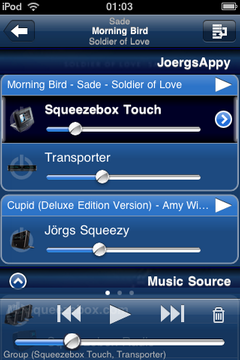
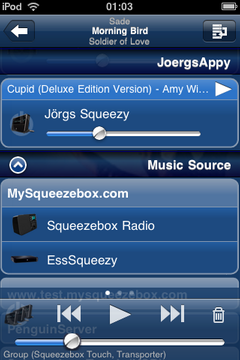
This is the “left hand” page within NowPlaying. It is your command center for players, servers and MySqueezebox.com. You can select the Current Player or Server here and you can simultaneously control all players connected to the Current Server.
Controlling Players
The MultiPlayer screen shows all Players connected to your Current Server, synchronized Players will be grouped together.
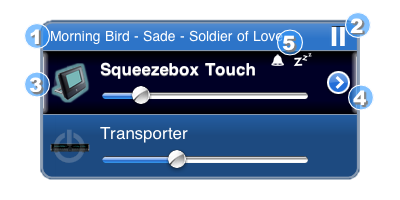
This is how a group of two Players will look like.
- This is the Current Track in the playlist the group is playing
- This is a Play/Pause button. You can use this to start/pause playback on this group.
- There are Power and Volume controls for each player. The Current Player (the one that is activated and for which menus will be shown) is shown in dark blue.
- The Current Player also has a details disclosure button to open a Context Menu for the player. Like usual in iPeng, you can also get the Context Menu through a hold gesture on the Player.
- Alarm and Sleep indicators. These are on when an Alarm is active and scheduled within the next 24h and when the Sleep mode is active, respectively.
You can select a Player to make it the Current Player.
The Player Context or Player Settings Menu
You can get this menu for the Current Player only. It will show a number of Player specific settings, most notably Alarm and Sleep. Some Plugins will also show their menus here.
Music Sources
Below the players of the Current Server, additional Music Sources will be shown. A Music Source is either a local Squeezebox Server or the MySqueezebox.com online service.
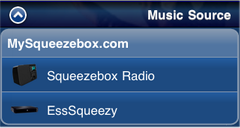
You can hide/show these additional Music Sources by tapping the Music Source headline.
If iPeng knows about Players connected to that source, it will them show them grouped with the source.
You can switch to a Music Source simply by selecting the source or one of it’s players. iPeng will then make this source the Current Server. In the process it will also ask you whether to carry along Players, that is whether it should move players from the old Current Server to the new one.
Changing Synchronization and Switching Servers
Again, having a look at
Help->Quick Tutorials->Players and Music Sources
will be useful.
 To change Synchronization or to move Players between Servers, you first have to enter Edit Mode using the Edit Mode Button in the top right of the screen.
Doing so will change the menu layout and functionality: The Volume sliders go away, more rows are being shown on one screen, the Main Controls give way for a Toolbar and each player gets a Check-Icon to the left and a Drag’n’Drop Handle to the right.
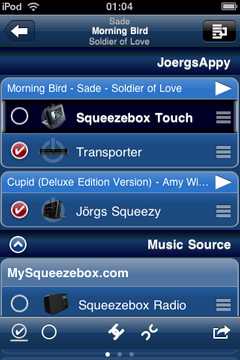
![]() In this mode, selecting a player will not change the Current Player, but will check or uncheck the player. You can then issue commands on the Toolbar on the checked items.
In this mode, selecting a player will not change the Current Player, but will check or uncheck the player. You can then issue commands on the Toolbar on the checked items.
![]() On the right hand side, there’s a Drag’n’Drop Handle. This can be used to move a player up and down in the list to drop it onto another Player or Sync Group or on a different Server.
On the right hand side, there’s a Drag’n’Drop Handle. This can be used to move a player up and down in the list to drop it onto another Player or Sync Group or on a different Server.
Note: A hold gesture on a player will NOT open a Context Menu but do a normal selection, that is: the Player will become the Current Player.

The Toolbar has shortcuts for a number of commands that are being executed on selected (checked) items:
- The two items on the left are to check or uncheck all Players in the list. The check item has three states which it toggles through which select all Players on the Current Server, all Players on other Servers and all Players on all Servers respectively (as applicable).
- The items in the center will synchronize or de-synchronize the selected Players. Synchronizing Players will bring up an extra dialog that asks which Player should be the Master, that is, which Player’s Current Playlist should be used for the Synchronized Group.
- The item to the right will switch the selected Players to a different Server. A dialog will ask for the Server to connect them to.
Synchronizing Players
In short: You can synchronize Players in two ways:
- You use the Handle to drag a Player onto another Player or Sync Group of Players. The dragged player will be synced to the one it’s dropped onto.
- You check the Players you want to synchronize and press the Sync button.
Changing the Music Source for a Player
In short: You can move a Player to a different Server (Music Source) in either of two ways:
- You use the Handle to drag the Player to the new Source
- You check one or more Players and select the Switch Server icon.
Current Playlist
The “Right Hand” view on NowPlaying is the Current Playlist view.
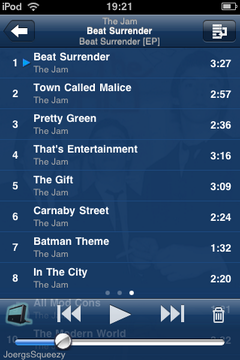
It will show the Current Playlist, let you scroll through it and select a track in the playlist to skip to. You can also edit and save the Current Playlist and get a Context Menu for each track.
The information in the playlist is obvious: position, song title and artists and song duration. Also, if your playlist has more than 100 tracks, iPeng will show a Dot Index to the right where each dot represents 25 tracks, so that the first one gets you to track 1, the second one to track 25 and so on. You can use that to quickly access very long playlists.
After a while of doing nothing, the playlist will automatically center on the Current Track.
Context Menu
Like a lot of items in iPeng, each track in the Current Playlist has a Context Menu (see General Usability to learn more about Context Menus). This Context Menu will be similar to the one for the Current Track that you get when doing a hold gesture on the cover art on NowPlaying Main (see above).
Editing the Current Playlist
 To edit the Current Playlist you have to change into Edit Mode using the Edit Mode Button in the top right of the screen.
Doing so will change the menu layout and functionality: The Main Controls give way for a Toolbar and each player gets a Check-Icon to the left and a Drag’n’Drop Handle to the right.
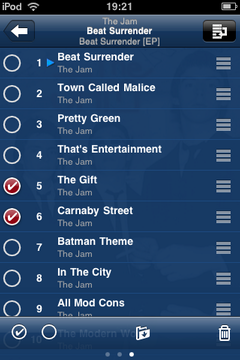
![]() In this mode, selecting a track will not start this track (make it the Current Track), but will check or uncheck the track. You can then issue commands on the Toolbar on the checked tracks.
In this mode, selecting a track will not start this track (make it the Current Track), but will check or uncheck the track. You can then issue commands on the Toolbar on the checked tracks.
![]() On the right hand side, there’s a Drag’n’Drop Handle. This can be used to move a track up and down in the list to re-order the Current Playlist.
On the right hand side, there’s a Drag’n’Drop Handle. This can be used to move a track up and down in the list to re-order the Current Playlist.

The Toolbar has shortcuts for a number of commands that are being executed on selected (checked) tracks:
- The two items on the left are to check or uncheck all tracks in the list.
- The item in the center is to Save the Current Playlist. A dialog will come up to enter the file name.
- The Trash icon will delete the checked tracks from the Current Playlist.

